• Home
  • About
    • Disclosure
      • Terms And Conditions
      • Cancellation Policy
      • Refund Policy
      • Shipping Policy
    • Contact Me
    • My Favorites
      • Our Toolbox
      • Paint Colors
      • My Amazon Store
  • Categories
    • Seasonal
      • Easter
      • Mother’s Day
      • Spring
      • Fall
      • Halloween
      • Thanksgiving
      • Christmas
      • Valentine’s Day
    • DIY
      • Repurposed
      • Furniture
      • Crafts
    • Our Home
    • Recipes
    • Crafts
      • Party Planning Ideas
      • Kids Activities
  • Resources
    • Furniture Flipping
      • Furniture Flipping Academy
      • The Furniture Flippers Social Media Planner
      • Furniture Flipping Assessment
      • Furniture Flippers E-Book
      • Mini Courses
      • Quick Guide To Painting Furniture
      • Types Of Paint For Furniture
    • Organization Tools
      • Organization Challenge
      • 5-Day Organization Challenge
      • 12 Monthly Purge Checklists
      • Sentimental Purge Guide
    • Thrifting | Decorating
      • 105 Things To Throw Away | Recylce | Sell | Donate For Instant Decluttering
      • 50 Things To Donate For Instant Decluttering
      • 50 Things To Throw Away For Instant Decluttering
      • How To Decorate Your Home On A Yard Sale Budget
      • 11 Quick Tips To Organize A Profitable Yard Sale
    • Consultations
    • Join My Newsletter
    • Become An Affiliate
  • Podcast
  • Learn With Me
  • Furniture Flipping Academy
    • Facebook
    • Instagram
    • Pinterest
    • RSS
    • Twitter
    • YouTube

My Creative Days

DIY blog sharing our home, budget decorating tips with repurposed farmhouse decor.

Repurposed DIY Wall Art For All Seasons

October 18, 2015 71 Comments

I am excited to share how we put this Repurposed Fall Wall Art together, but I am even more excited to be collaborating with so many creative bloggers in this Fall Tour. We have all come together to share beautiful fall projects that will inspire you to decorate this fall season. All of the fall projects are at the bottom of this post so before you get settled, I suggest you grab a blanket, your favorite fall drink and a comfy spot because you are gonna be here awhile. There is so many great ideas to see! 

I couldn’t be more happy with how this Repurposed Fall Wall Art came together. We used things we had on hand to put it together and it was relatively easy to do.

If you are looking for wall art to add to your home, this DIY wall art is easy to make and you can use it all year round just by changing out what is in the tubes!

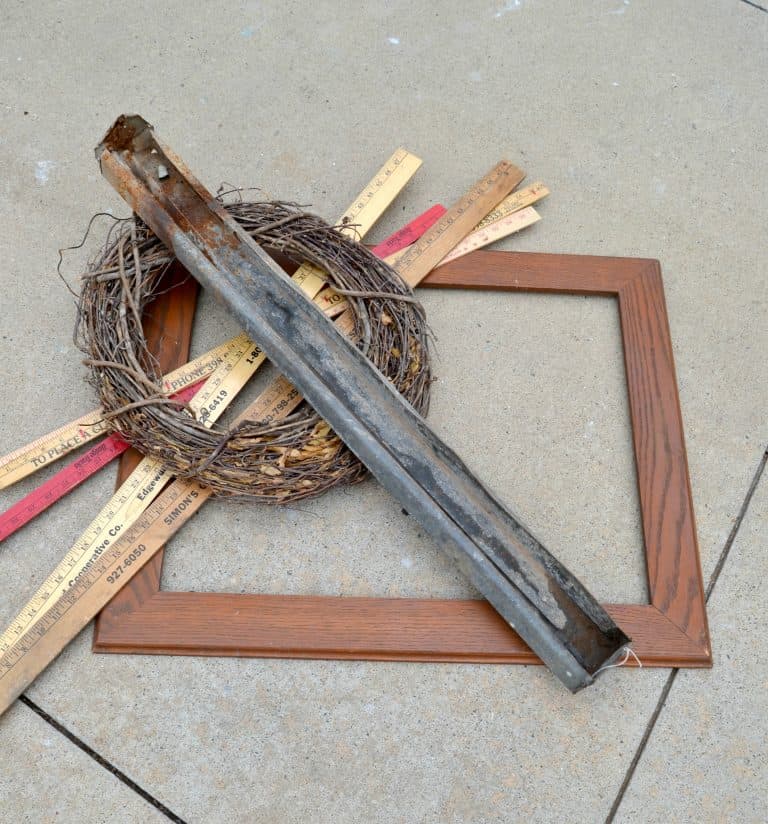
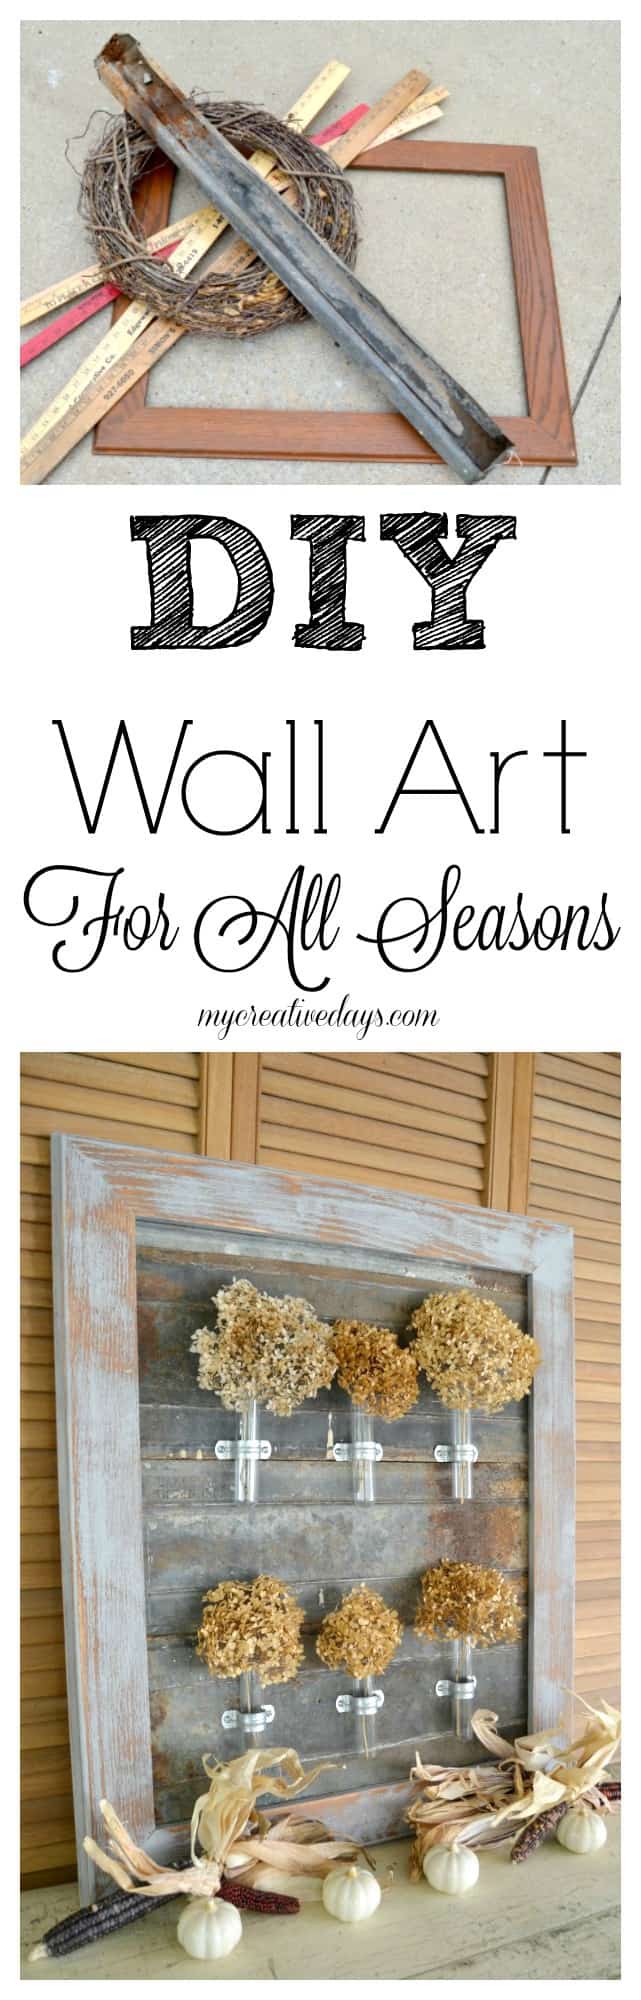
This project started out as this pile of goodness. I grabbed a few different things I thought we would use, but then after talking it over with Matt, he made a suggestion that I didn’t even know would be possible.

If you are looking for wall art to add to your home, this DIY wall art is easy to make and you can use it all year round just by changing out what is in the tubes!

(Affiliate links are used in this post so you can easily find the supplies we used in this project. You can see my full disclosure here.)

Supplies Used To Make Repurposed Fall Wall Art:

Wood Frame (Our frame was 24″ x 36″, but you can use any size you like. You can usually find great frames at thrift stores.)

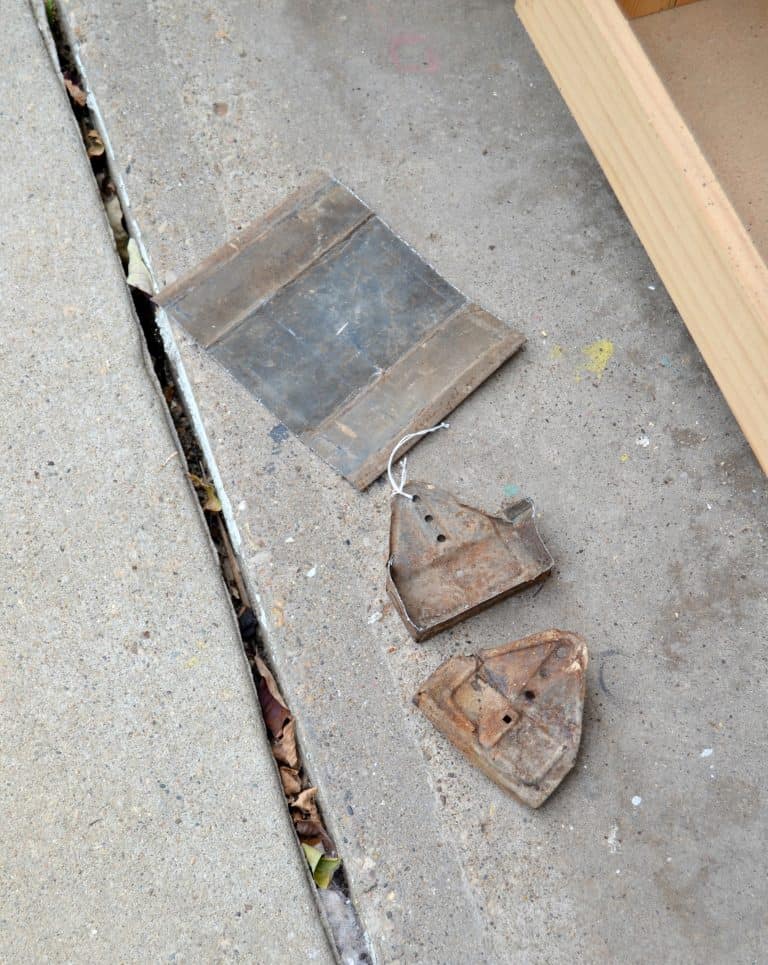
Galvanized Metal (We reused a chicken feeder, but you can buy metal sheets to use as well that will give you the same look.)

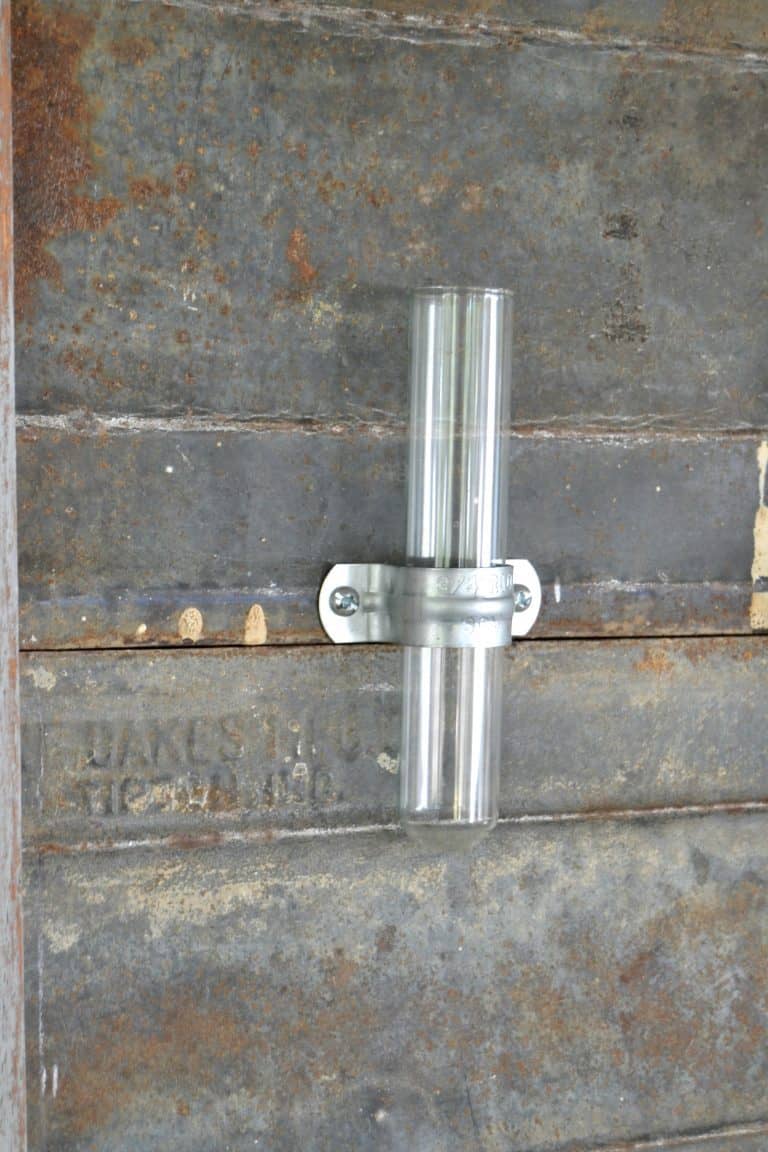
Plastic of Glass Clean Tubes (I found a set at a yard sale, but these are very similar.)

Clamp Fasteners (You need one for each tube.)

Jigsaw

Metal Blade

Hammer

Initially, I wanted to use our yard stick supply behind the tubes, but we didn’t have enough to fit the entire frame. Then, Matt told me he thought he could bend the chicken feeder and I could use the metal on the back of the frame. I was super excited about that because I love galvanized metal on anything.

Directions To Make Repurposed Fall Wall Art:

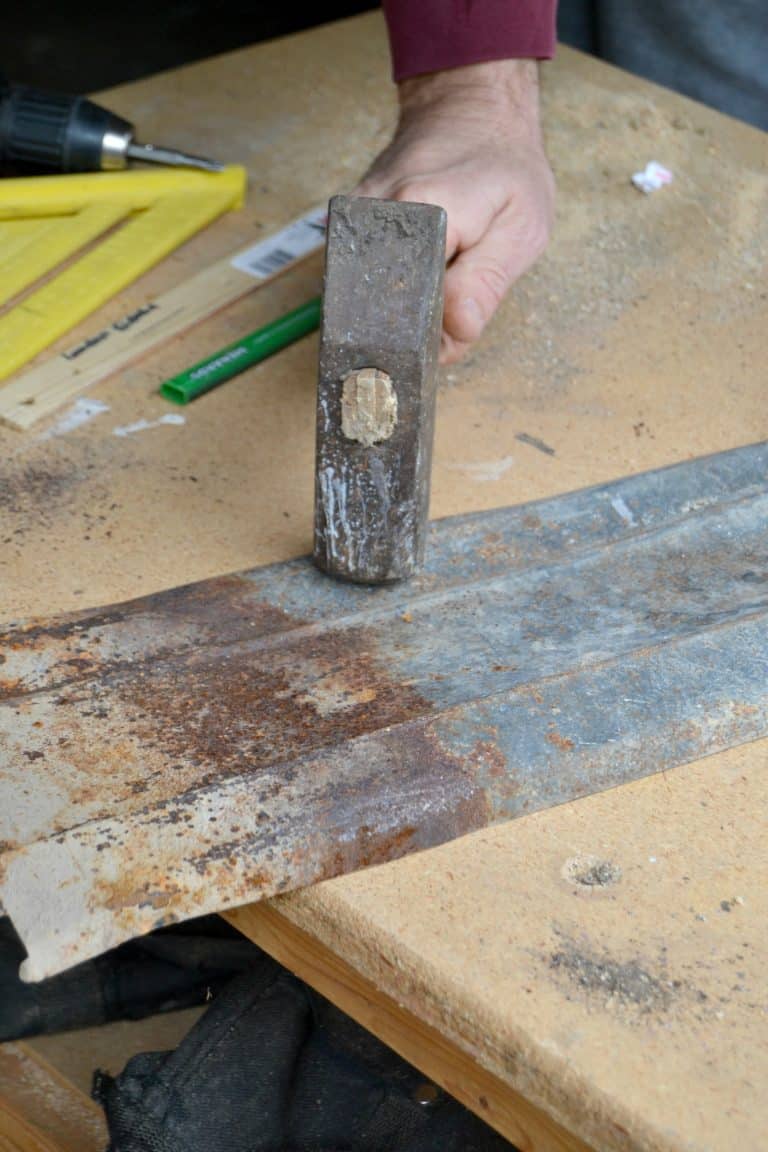
First, Matt cut the ends off the chicken feeder with a metal blade.

If you are looking for wall art to add to your home, this DIY wall art is easy to make and you can use it all year round just by changing out what is in the tubes!

Then, he used a heavy hammer to flatten the chicken feeder. It was easy to do.

If you are looking for wall art to add to your home, this DIY wall art is easy to make and you can use it all year round just by changing out what is in the tubes!

We did actually use one of the yard sticks in this project. Matt screwed it onto the end of the work bench to hold the metal in place as he cut it. Whatever works to get the job done around here. 😉

If you are looking for wall art to add to your home, this DIY wall art is easy to make and you can use it all year round just by changing out what is in the tubes!

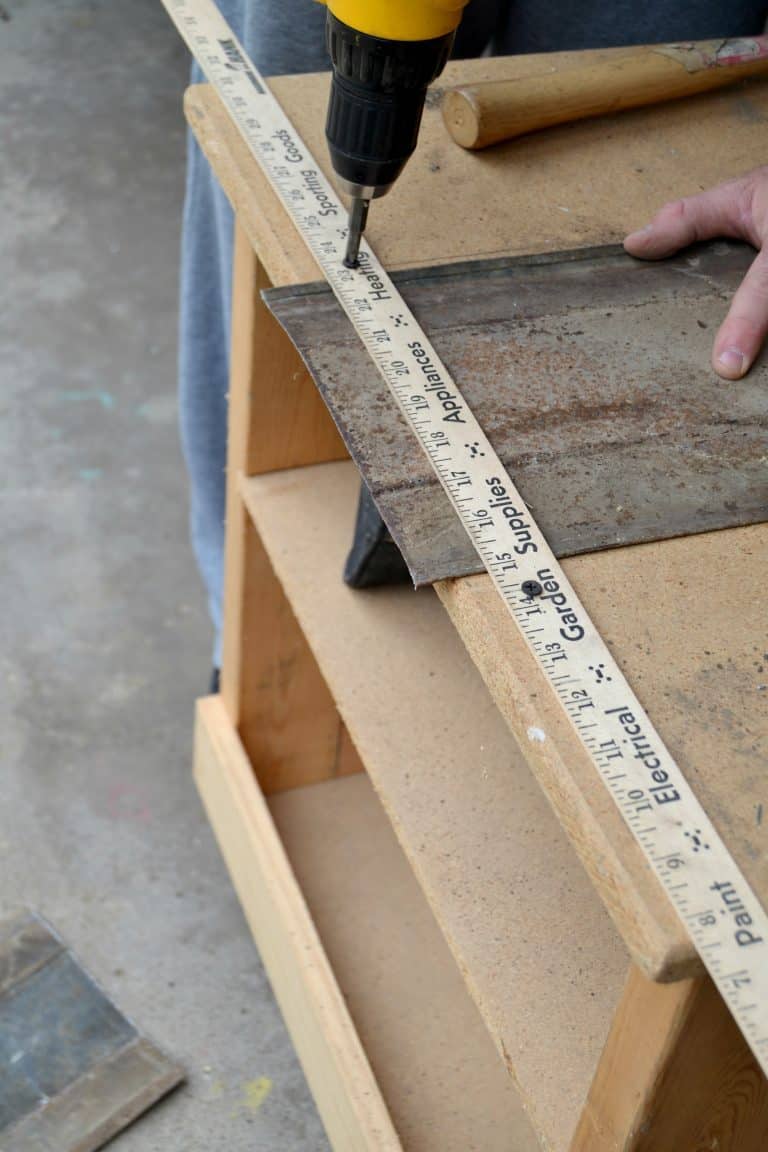
To make the hammered galvanized metal the size we needed it, Matt used a jigsaw fit with a metal blade. The yard stick worked great to slide the metal underneath and hold it in place.

If you are looking for wall art to add to your home, this DIY wall art is easy to make and you can use it all year round just by changing out what is in the tubes!

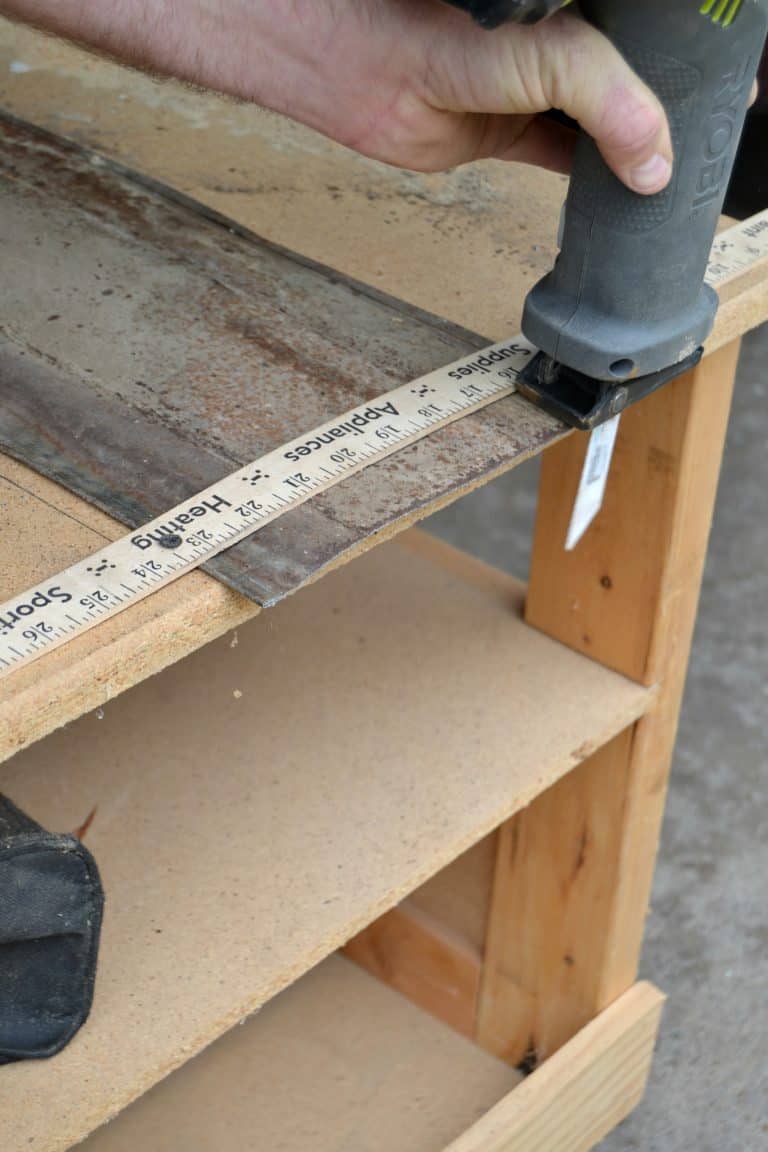
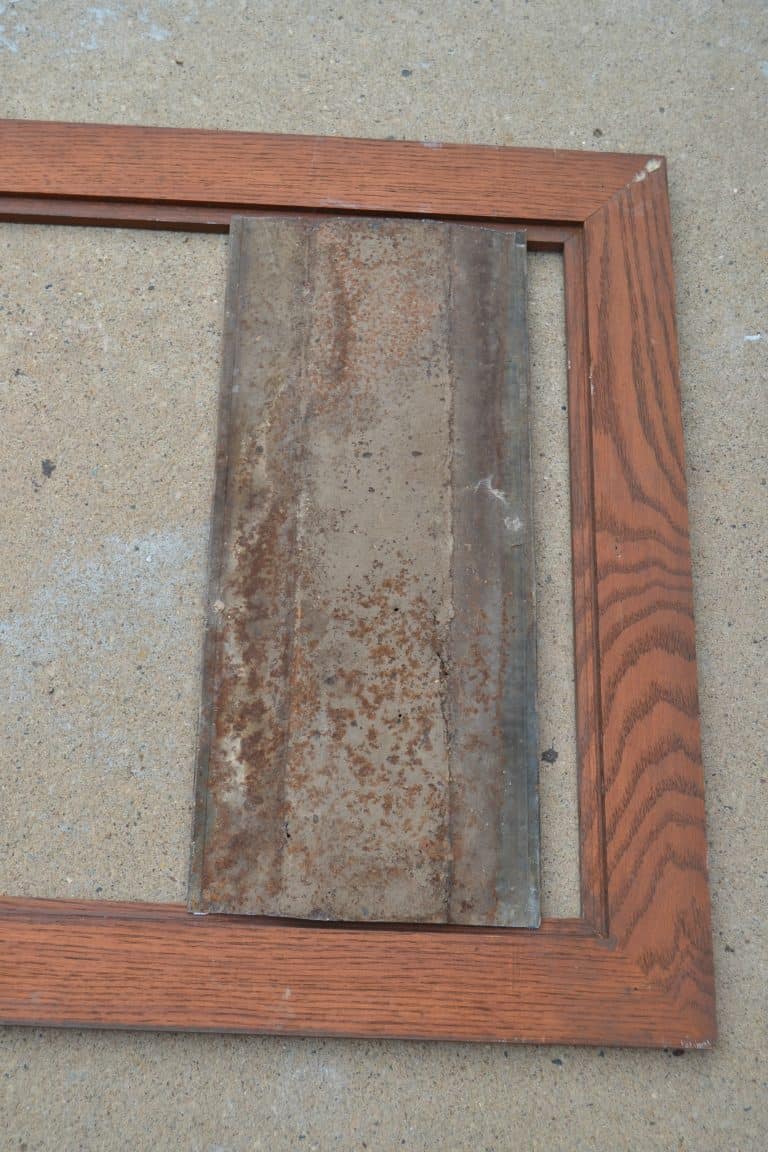
We were able to get four pieces from the flattened chicken feeder to cover the entire frame.

If you are looking for wall art to add to your home, this DIY wall art is easy to make and you can use it all year round just by changing out what is in the tubes!

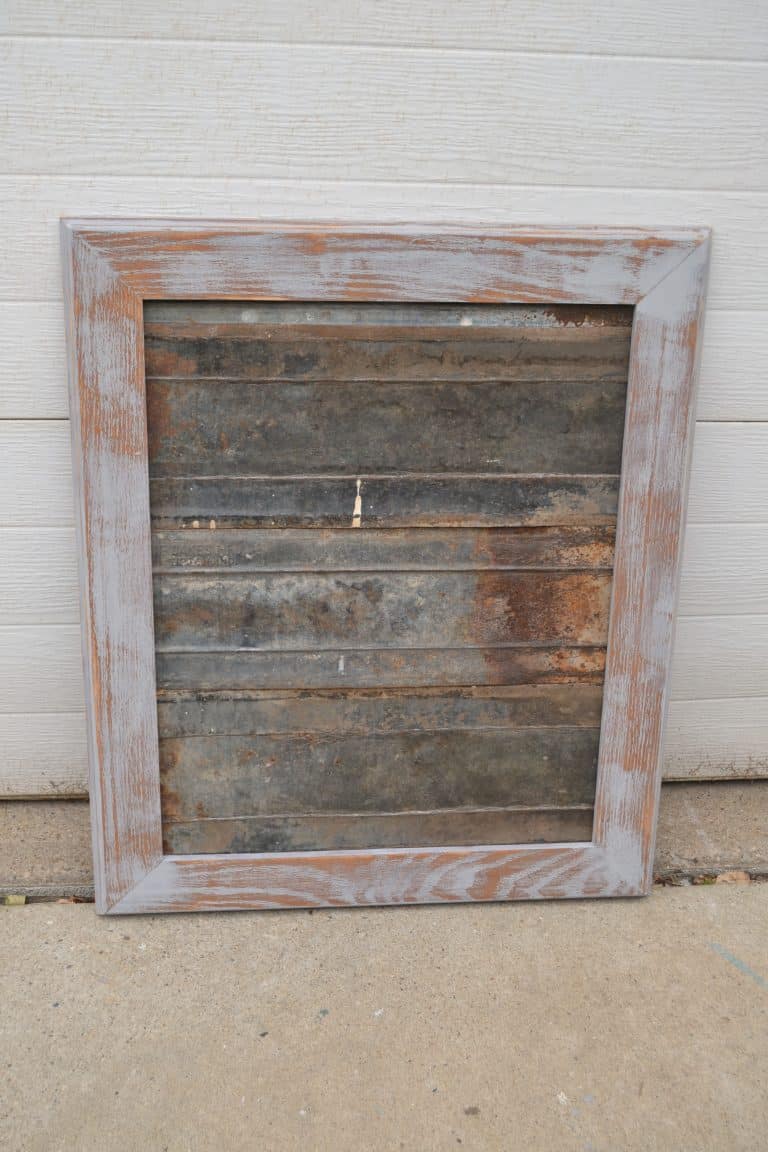
I painted the frame gray and then sanded it down pretty well.

Isn’t is magical already?!

If you are looking for wall art to add to your home, this DIY wall art is easy to make and you can use it all year round just by changing out what is in the tubes!

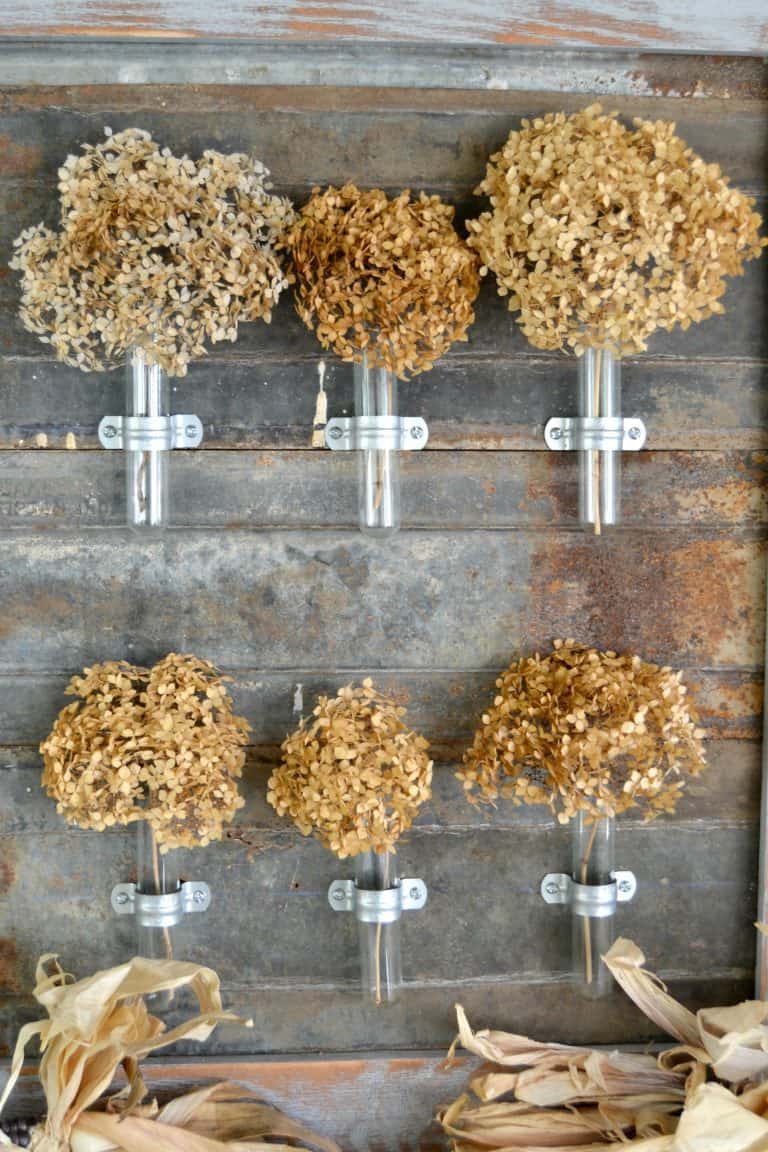
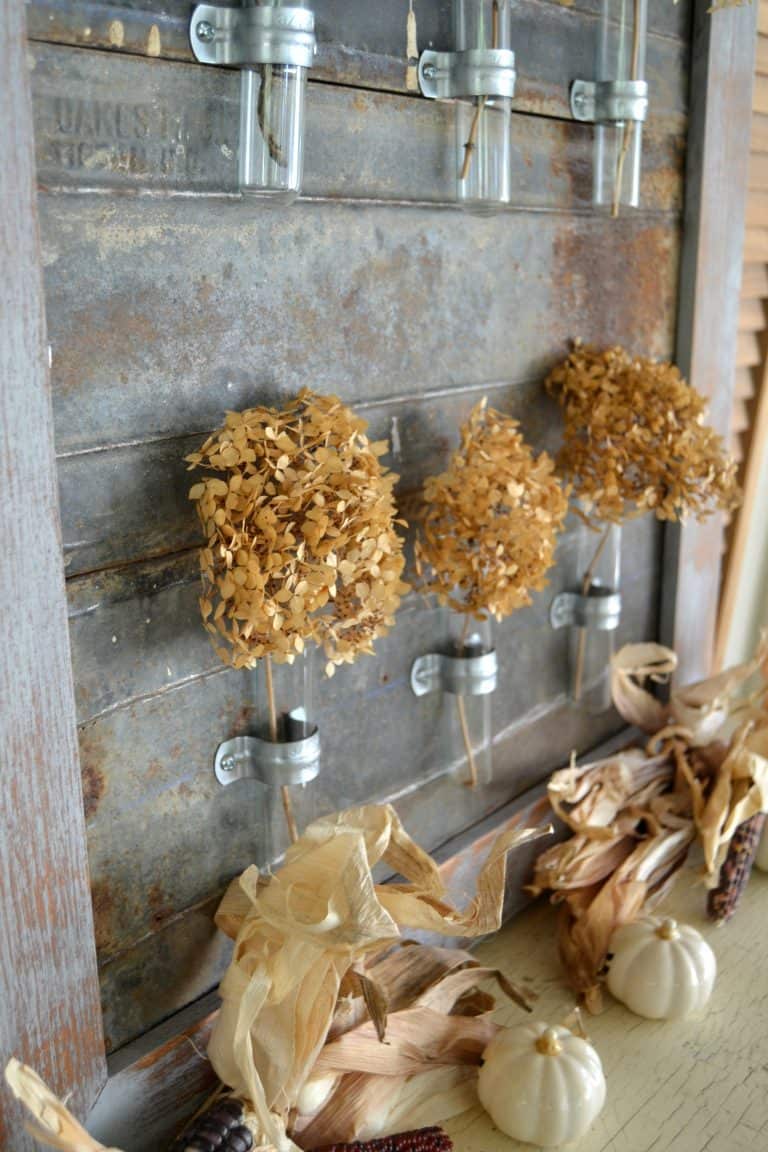
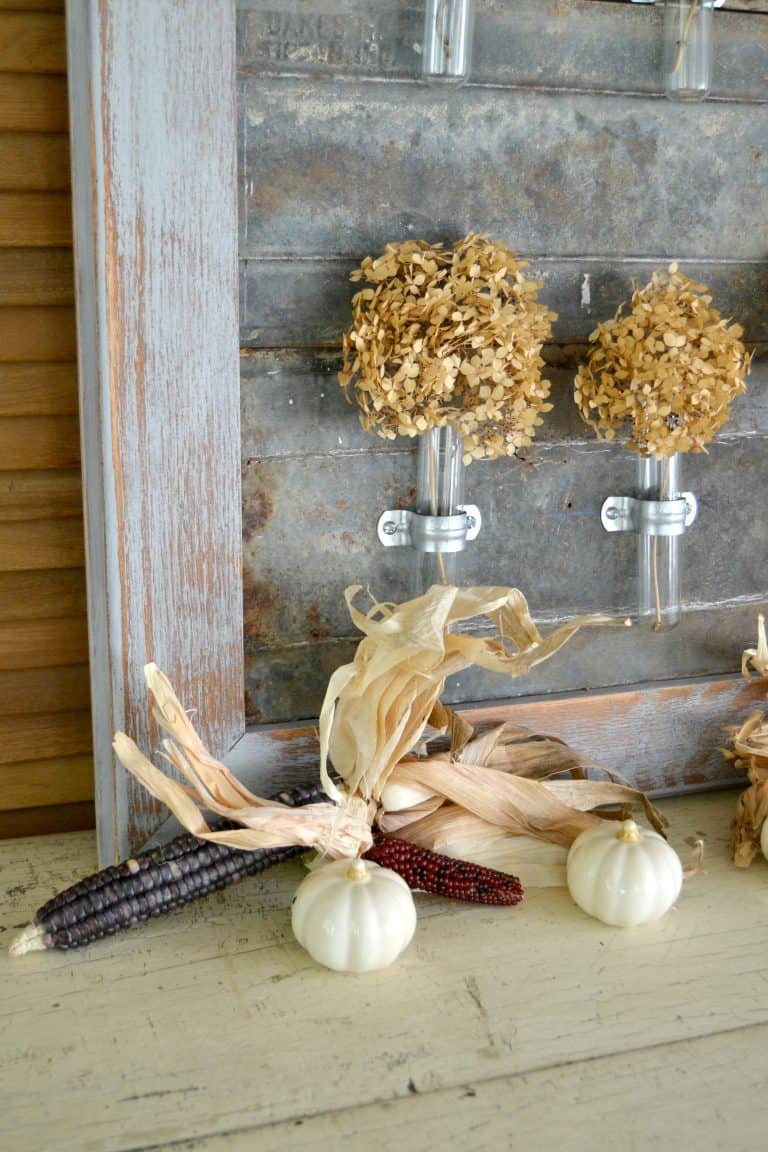
The next addition were the “tubes” I found at a yard sale.

If you are looking for wall art to add to your home, this DIY wall art is easy to make and you can use it all year round just by changing out what is in the tubes!

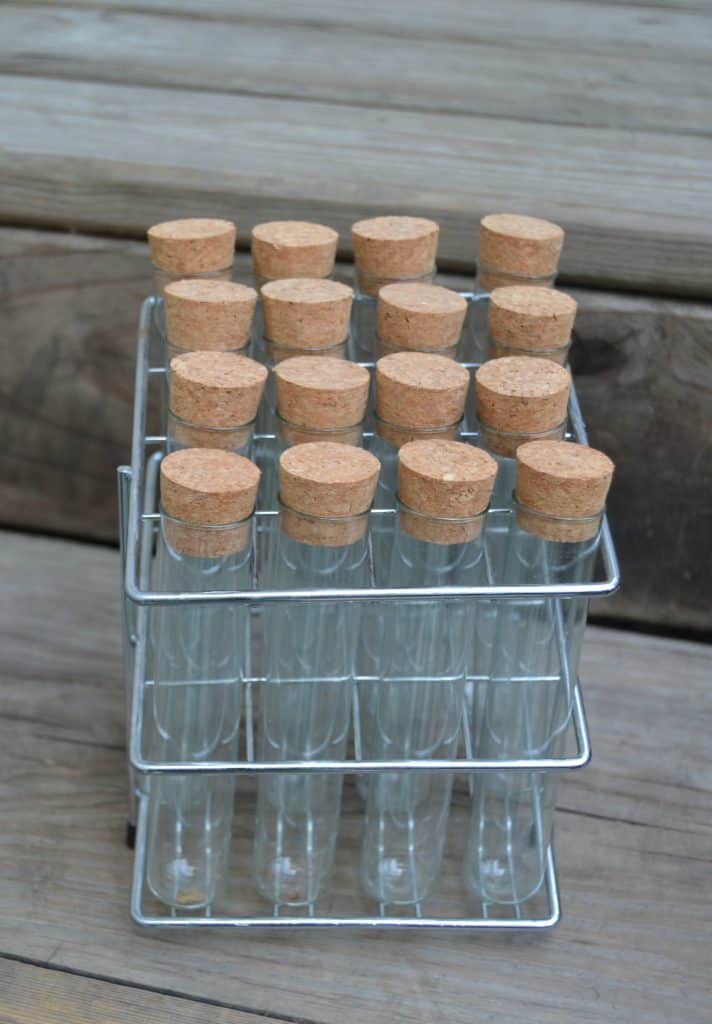
We used metal clamps to attach them to the metal.

If you are looking for wall art to add to your home, this DIY wall art is easy to make and you can use it all year round just by changing out what is in the tubes!

I was going to fill the tubes with faux fall flowers and berries I had in a box. But, while I was outside, these dried hydrangeas stole my heart and were the perfect fit for this project.

If you are looking for wall art to add to your home, this DIY wall art is easy to make and you can use it all year round just by changing out what is in the tubes!

If you are looking for wall art to add to your home, this DIY wall art is easy to make and you can use it all year round just by changing out what is in the tubes!

I can’t believe how well this project turned out with only $5 invested!

If you are looking for wall art to add to your home, this DIY wall art is easy to make and you can use it all year round just by changing out what is in the tubes!

I hope you grabbed your blanket and favorite fall drink because now you are ready to get lost in this Fall Inspired Wonderland. Head over to Hometalk to see all the projects as well!

ENJOY!

An InLinkz Link-up


PIN THIS POST!

If you are looking for wall art to add to your home, this DIY wall art is easy to make and you can use it all year round just by changing out what is in the tubes!

If you liked this DIY Wall Art post, you will also love these wall art ideas:

DIY Barn Wood Arrow Tutorial

Repurposed Arrow Art

5 Minute Arrow Art

Sharing is caring!

143 shares
  • Share

Filed Under: DIY Projects, Fall, Repurposed, Seasonal, Uncategorized Tagged With: DIY, diy wall art, fall, fall art, wall art

Click HERE to Support My Creative Days

Connect with Me!


Join my newsletter for the latest project tutorials, DIY techniques, frugal decorating tips, and exclusive content.
SEND IT TO ME

« 5 Ways To Make Your Fall Decor Welcoming
Easy Chicken Pot Pie Recipe »

Comments

  1. Roxanne says

    October 18, 2015 at 8:47 PM

    I love how this project evolved-into perfection! It really is awesome!!

    Reply
    • Lindsay says

      October 19, 2015 at 10:51 AM

      Thank you Roxanne!

      Reply
  2. Lucy @ Patina Paradise says

    October 18, 2015 at 9:16 PM

    What a great repurpose! I love the patina and rustic elegance of it! Just my style! ;o)

    Reply
    • Lindsay says

      October 19, 2015 at 10:50 AM

      Thanks Lucy! I am so happy with how it turned out.

      Reply
  3. Angie @ Knick of Time says

    October 18, 2015 at 10:05 PM

    I absolutely LOVE this – pinning!

    Reply
    • Lindsay says

      October 19, 2015 at 10:50 AM

      Thank you Angie!

      Reply
  4. Funky Junk Interiors says

    October 18, 2015 at 10:32 PM

    Ohhh Lindsay… I’m so head over heels in LOVE with this! The metal with wood with glass with dried hydrangeas…. gah!!! Everything I love. You just nailed this. It’s so beautiful!

    Thanks for joining the blog hop! This was a real junk treat!

    Reply
    • Lindsay says

      October 19, 2015 at 10:50 AM

      Thank you so much Donna! You made my day!

      Reply
  5. Vanessa says

    October 18, 2015 at 11:24 PM

    Lindsay,
    What a great DIY! I love this idea and the rusty metal is awesome.

    Reply
    • Lindsay says

      October 19, 2015 at 10:49 AM

      Thank you Vanessa!

      Reply
  6. Pamela-FromMyFrontPorchToYours says

    October 19, 2015 at 8:23 AM

    What a beautiful piece! I love how it turned out.

    Reply
    • Lindsay says

      October 19, 2015 at 10:49 AM

      Thank you Pamela!

      Reply
  7. Amber says

    October 19, 2015 at 9:15 AM

    I saw this project in the HomeTalk email this morning! Also, I can’t believe you found those tubes at a garage sale!!

    Reply
    • Lindsay says

      October 19, 2015 at 10:49 AM

      Thanks so much for stopping by Amber!

      Reply
  8. Kim says

    October 19, 2015 at 9:19 AM

    Gorgeous! Super rustic and I love that you can use it all year long!

    Reply
    • Lindsay says

      October 19, 2015 at 10:49 AM

      Thank you, Kim!

      Reply
  9. Patti says

    October 19, 2015 at 11:05 AM

    Hi Lindsay,

    Love this idea. I am a big fan of hydrangeas and the test tube vases are adorable. So inspiring!!

    Reply
    • Lindsay says

      October 19, 2015 at 6:30 PM

      Thank you Patti!

      Reply
  10. Anne says

    October 19, 2015 at 12:11 PM

    What a creative idea, I LOVE this!!! That can be used all year round! What fun adding different flowers or greens for winter!

    Reply
    • Lindsay says

      October 19, 2015 at 6:30 PM

      I am excited to decorate it for different seasons!

      Reply
  11. ananda says

    October 19, 2015 at 1:26 PM

    oh lindsay i am so thrilled you came by and beyond thrilled to discover your stunning blog! where have you been? =)
    LOVE love love this !!! such artistic and brilliant ways to bring together all the pieces! beautiful!!

    Reply
    • Lindsay says

      October 19, 2015 at 6:30 PM

      Thank you so much for stopping by Ananda!

      Reply
  12. Marie from The Interior Frugalista says

    October 19, 2015 at 1:42 PM

    Ooooooh, I love the patina on the tin and framing it idea. Adding test tubes is very clever Lindsay. I can see how much fun it’s going to be decorating it for all the seasons. Looking forward to seeing how you decorate it for the holidays! Pinninh.

    Reply
    • Lindsay says

      October 19, 2015 at 6:29 PM

      Thank you Marie!

      Reply
  13. Pam @ House of Hawthornes says

    October 19, 2015 at 2:23 PM

    That is so cool! I never would have thought of using the chicken feeder for the backing!

    Reply
    • Lindsay says

      October 19, 2015 at 6:29 PM

      Thank you Pam!

      Reply
  14. Kim~madeinaday says

    October 19, 2015 at 3:39 PM

    Sooo pretty Love this upcycle! Thanks for linking up to Merry Monday! Sharing on FB Wednesday! Have a great week!
    Kim

    Reply
    • Lindsay says

      October 19, 2015 at 6:28 PM

      Thank you Kim!

      Reply
  15. Bre @ Average But Inspired says

    October 19, 2015 at 8:08 PM

    Oh my gosh, I am obsessed with this! The test tubes as vases are my most favorite thing ever! My mom is a science teacher and she would die if I were to make her something like this. Thank you for the inspiration!! 🙂

    Reply
    • Lindsay says

      October 22, 2015 at 12:32 PM

      Your welcome Bre! Thank you!

      Reply
  16. Thea says

    October 19, 2015 at 10:07 PM

    Lindsay what I love about your Fall DIy is that it is truly one of a kind. It is not a replication or copycat of anything I have ever seen. I love the rustic look combined with a bit of beauty from the flowers. Stunning!

    Reply
    • Lindsay says

      October 22, 2015 at 12:31 PM

      You just made my day! Thank you Thea! XO

      Reply
  17. Jenny @ Refresh Living says

    October 19, 2015 at 10:15 PM

    I am in love with the chicken feeder metal background!! It doesn’t get any better than that! And those test tubes just give it the perfect rustic industrial touch. I LOVE it!

    Reply
    • Lindsay says

      October 22, 2015 at 12:31 PM

      Thank you Jenny!

      Reply
  18. Kristi @ Chatfield Court says

    October 20, 2015 at 2:49 AM

    Love everything about this, so creative!

    Reply
    • Lindsay says

      October 22, 2015 at 12:31 PM

      Thank you Kristi!

      Reply
  19. Kim @ hunt & host says

    October 20, 2015 at 9:37 AM

    I NEED this. I am going to have to make something similar for sure. I love the easiness of filling a bud vase and the big impact it gives your home! Pinning! kim

    Reply
    • Lindsay says

      October 22, 2015 at 12:31 PM

      Thank you Kim!

      Reply
  20. Emily @ Two Purple Couches says

    October 22, 2015 at 2:26 PM

    Lindsay, this is SO neat and innovative! I thought for sure the background was wood!

    Reply
    • Lindsay says

      October 22, 2015 at 4:19 PM

      Thanks Emily. I just love it too. Repurposed projects are the best!

      Reply
  21. Abby says

    October 23, 2015 at 1:19 PM

    This is so beatiful! I NEVER would have guessed it all started with that pile of scraps. I can’t wait to see what you do with those yard sticks 🙂

    I’m hosting a link party over on my blog and we’d love for you to come link up with us! http://winsteadwandering.com/the-alder-collective-link-party-no-3/

    Reply
    • Lindsay says

      October 23, 2015 at 1:44 PM

      Thank you so much! I linked up with ya!!!

      Reply
  22. Suzie@homemaker-mom says

    October 23, 2015 at 7:06 PM

    Ok this is amazing. I have craft upcycling envy now! Wonderful job!

    Reply
    • Lindsay says

      October 26, 2015 at 4:43 PM

      Thank you!

      Reply
  23. Heidi says

    October 25, 2015 at 2:53 PM

    What a great and fun idea! Great job!

    Reply
    • Lindsay says

      October 26, 2015 at 4:41 PM

      Thank you!

      Reply
  24. Alicia | A Burst of Beautiful says

    October 26, 2015 at 7:58 PM

    What a terrific idea! I love that you can use it all year round too. It will look so pretty in the spring with some fresh florals! Thank you for sharing at Create • Share • Inspire! We hope to see you again this week.

    xo

    Reply
    • Lindsay says

      October 27, 2015 at 12:27 PM

      I am excited to decorate it throughout the year! Thanks Alicia!

      Reply
  25. Cat @ Pocketful of Posies says

    October 27, 2015 at 7:28 AM

    This is so so beautiful! Thank you so much for stopping by and sharing at Dream. Create. Inspire. Link! I am pinning your idea! I hope we’ll see you there again this week!

    Cat

    Reply
    • Lindsay says

      October 27, 2015 at 12:26 PM

      Thank you Cat!

      Reply
  26. Kathryn Griffin @TheDedicatedHouse says

    October 27, 2015 at 8:54 AM

    Oh, goodness! This is amazing! Thank you for sharing. You are one of the features at the Make it Pretty Monday party at The Dedicated House. Here is the link to this week’s party. http://www.thededicatedhouse.com/2015/10/make-it-pretty-monday-week-155.html Hope to see you again at the bash! Have a lovely week ahead. Toodles, Kathryn @TheDedicatedHouse

    Reply
    • Lindsay says

      October 27, 2015 at 12:26 PM

      Thank you so much KAthryn!

      Reply
  27. Cristi says

    October 27, 2015 at 9:27 PM

    This is amazing! I love it! I can’t believe it started from what it did. Thanks so much for linking up with The Alder Collective! Hope you’ll join us again this week! Have an awesome night!

    Reply
    • Lindsay says

      October 28, 2015 at 2:42 PM

      Thanks Cristi!

      Reply
  28. Julie says

    October 28, 2015 at 3:26 AM

    What a gorgeous project. I love how you’ve used the metal, although I think it would be outside my diy skills. I’m feeling confident I could probably manage some other sort of background though, I think my home NEEDS a frame with little test tubes of flowers in it!

    Reply
    • Lindsay says

      October 28, 2015 at 2:39 PM

      Thank you Julie!

      Reply
  29. Timothy says

    June 1, 2018 at 10:15 PM

    Great ideas, thanks for sharing.

    Reply

Leave a Reply Cancel reply

Your email address will not be published. Required fields are marked *


follow along

  • Facebook
  • Instagram
  • Pinterest
  • RSS
  • Twitter
  • YouTube

search the blog

Listen In!

CLICK TO DOWNLOAD FOR FREE

My Creative Days is a participant in the Amazon Services LLC Associates Program, an affiliate advertising program designed to provide a means for sites to earn advertising fees by advertising and linking to Amazon.com
If you are looking for the best paint brushes for furniture makeovers, you don't have to look any further. Click over to find the paint brushes that everyone needs in their toolbox when painting furniture or anything for that matter.

Best Paint Brushes For Furniture Makeovers

The Best Black Matte Furniture Paint

DIY Farmhouse Table - Want a farmhouse table? Make your own! Check out how to refinish one easily from My Creative Days.

Farmhouse Table DIY Made From A Dumpster Find

DIY Farmhouse Office Sign

DIY Office Sign

PO Box 11823, Cedar Rapids, Iowa, 52410
Copyright © 2023 · Design + Development by Grace + Vine Studios · Privacy Policy

143 shares