I want to thank Zibra paint for partnering with me on this vintage buffet makeover DIY. All opinions are my own.
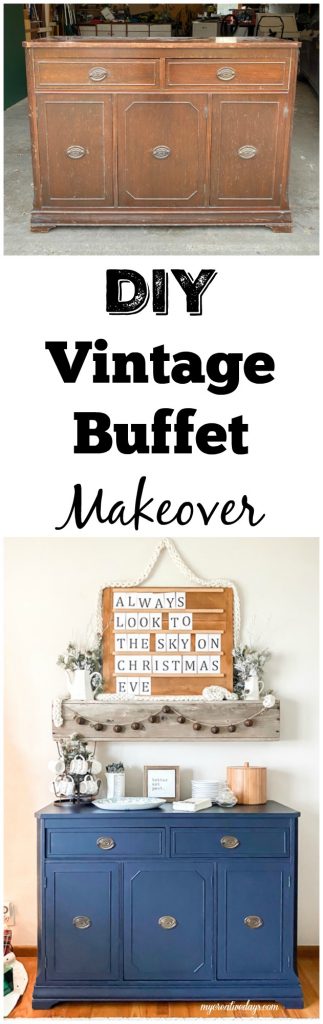
I love rescuing buffets!!! I haven’t found one in the longest time and was so excited when I saw this one at my local Restore.
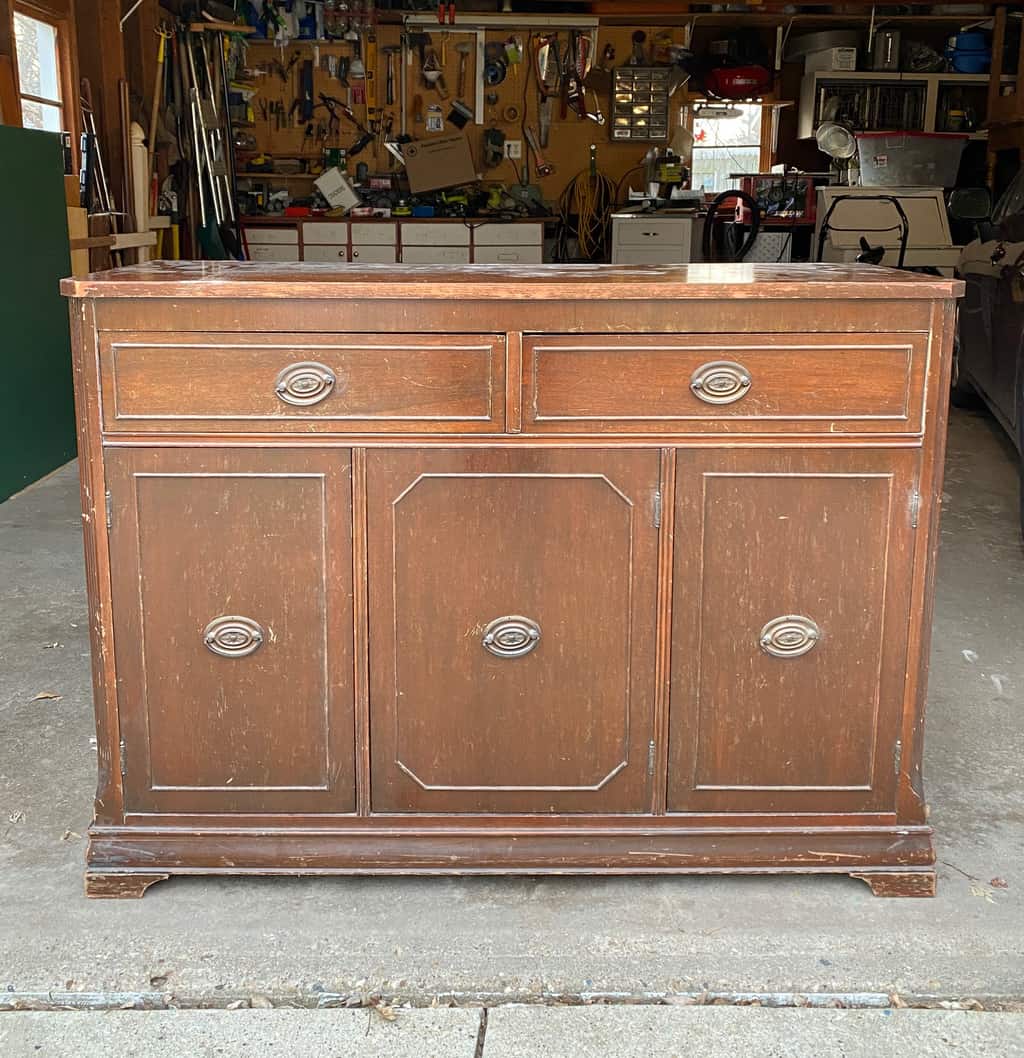
It seems like when I find buffets, they are always so expensive that I can’t rescue them to make them over. When I saw this guy in the store, I just knew he was going to be too expensive that I didn’t even get a closer look right away. I walked around the rest of the store and looked at the buffet as I was walking out.
It was marked $35!
What?
No. I read that wrong. My eyesight has been changing a little bit (I haven’t admitted that out loud yet, so let’s keep that between us).
I bent down lower to get a better look at the price tag. There had to be a 1 in front of the 35. $135 is more like the price of buffets when I find them. This one even had all of the original hardware at so there was no way it was $35.
Imagine my surprise when I found out my eyes were working. They saw the right price the first time! (Insert happy dance because I am now celebrating the fact that my eyes work fine. Who said their eyesight was getting worse? Not me.)
Whoever priced this buffet knew what they were doing. They knew that someone, who could still see the potential, would have to do some work to this piece. They priced it what it was worth in the condition it was in. It makes me so happy when people price pieces this way! YES!!! It will take some time and effort to make this buffet beautiful again, but I am always up for that challenge.
Problems With The Buffet:
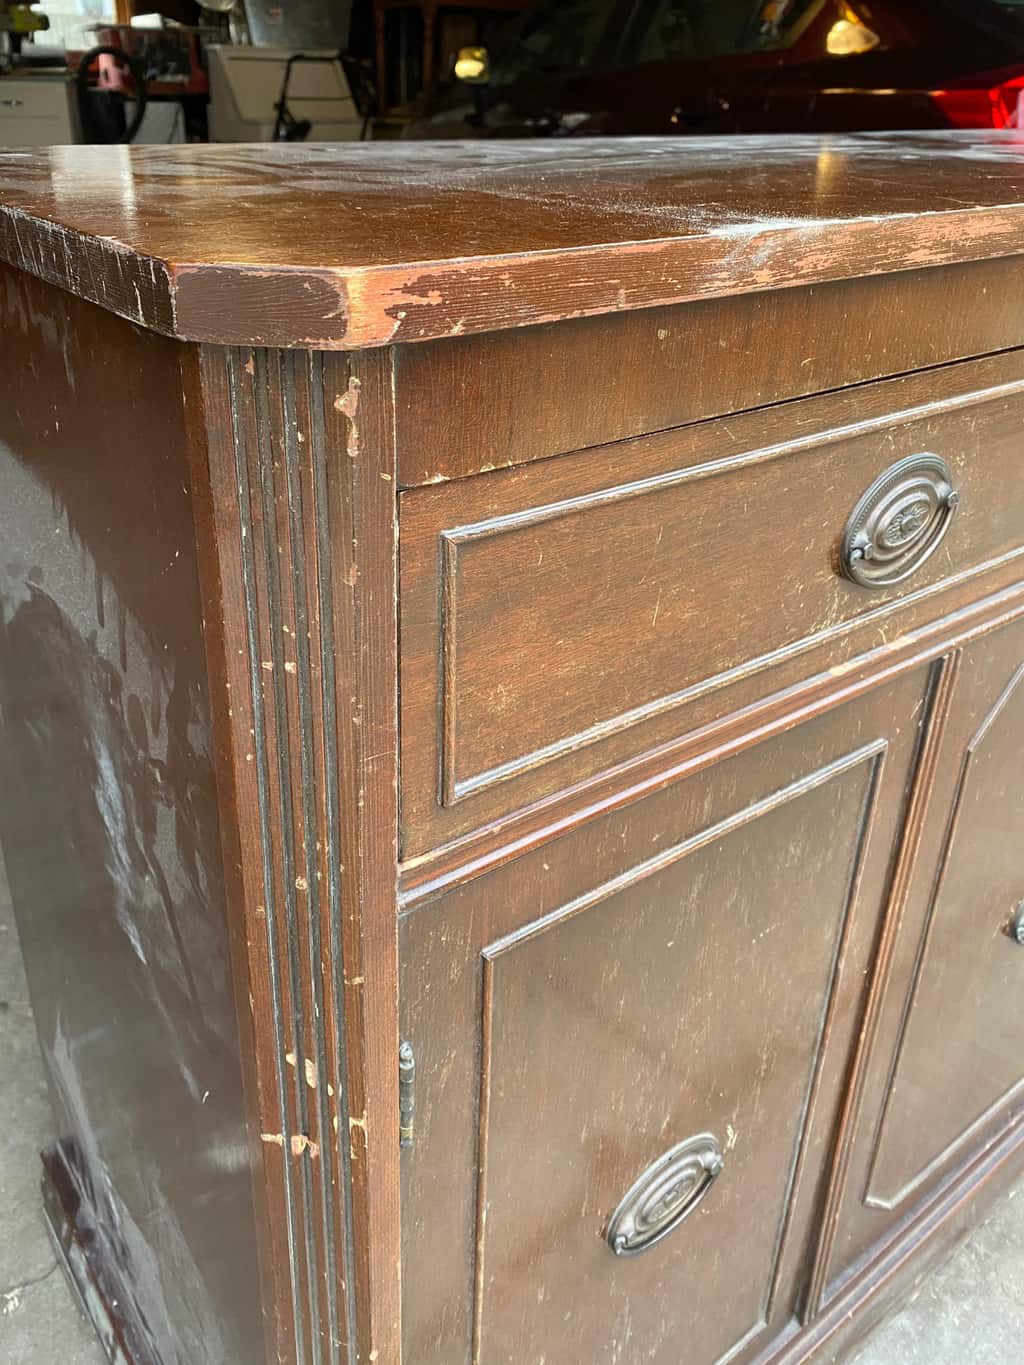
- There are a lot of scratches all over the piece.
- The hardware is crooked.
- The finish is off in some areas.
- There are some divots in the wood.
- The color is not pretty.
- It was very dusty.
- The drawers needed some fixin’.
These are the things that most people see when they run across a piece like this. They can’t see past that list and end up spending way too much money on a different piece to decorate their home. Save that money and get creative! You can decorate just like you want with one of kind pieces on a dime.
The list of reasons above are the EXACT reason I bought the buffet. There is nothing so wrong with it that can’t be fixed or changed. All of the “problems” are reasons why the price was perfect for decorating on a dime and making it over to fit your style is the reason you need to buy it. For $35, some supplies and a little work, you can have a beautiful piece in your home that you can use in so many ways. See my post about 5 Ways To Use A Wood Dresser In Your Home to see how I would use this piece in our home.
{Affiliate links are used in this post. Click on any of the underlined links to find the products I am talking about. You can read my disclosure HERE.}
Supplies Used In This Project
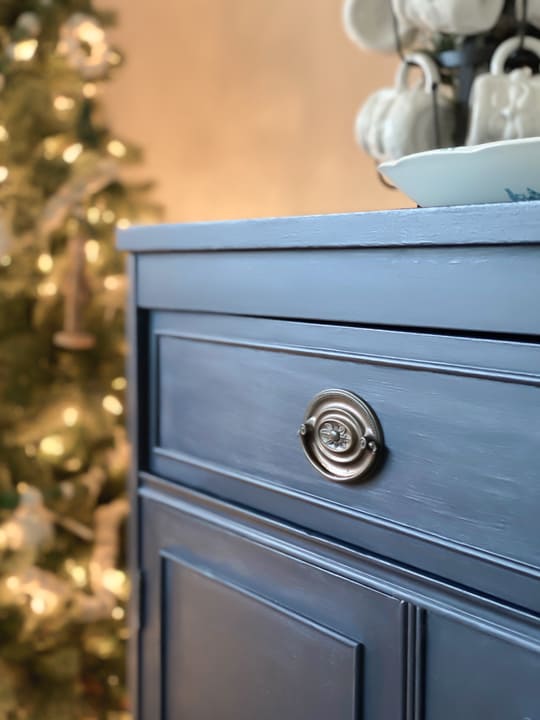
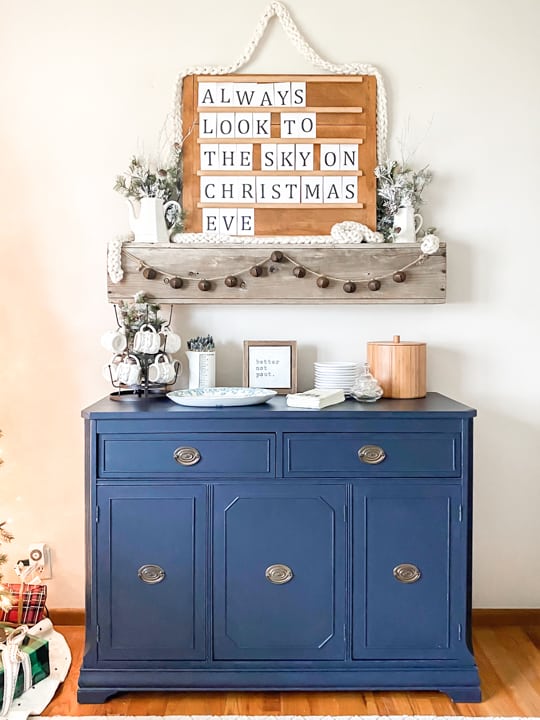
“In The Navy” – Dixie Belle Paint
Fusion Mineral Paint Tough Coat Matte Wipe-on Poly
Steps To This DIY Vintage Buffet Makeover
- First, remove all the hardware.
- Now, clean the entire piece. Use a damp cloth when it is just surface dust and dirt.
- Let the piece fully dry after you clean it.
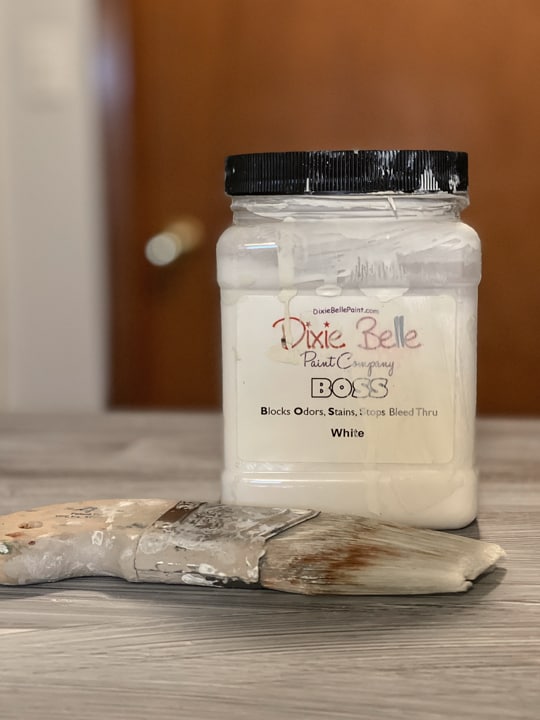
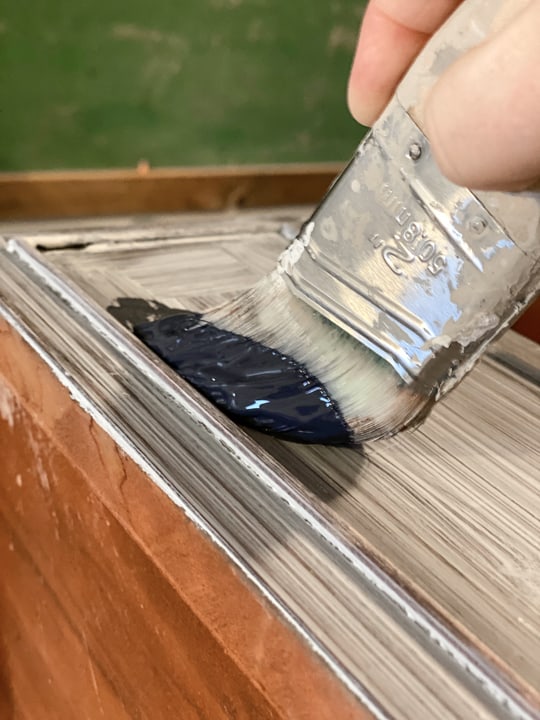
- For this piece, it had a red undertone, so I wanted to add a primer coat, so that redness didn’t bleed through the paint. For that, I use BOSS.
- I use a Zibra paint brush to apply the BOSS. It goes on like paint and once it dries it feels like raw wood to me. It is a good barrier for projects like this to ensure nothing bleeds through once you apply the paint. I only do one coat of BOSS on most projects.
- Once the BOSS is dry, it is time to paint. Grab your favorite Zibra paint brush and have the best painting experience you will have. These brushes are amazing and they really do make painting enjoyable. We use them for all of our painting jobs. They are the only brushes at our flip houses and they are the only brushes I use on all of my furniture makeovers.
-
Choose your color and start applying the paint. The amount of coats you do will be determined by your piece. I put two coats of “In The Navy” – Dixie Belle Paint on this buffet. Make sure your first coat dries fully before adding another coat of paint.
- Once all the paint is on the buffet and it is fully dry, you can add a top coat. I get the question about top coat a lot. I don’t always put a top coat on pieces I do. For a buffet that will see a lot of use, I think it is important. I used the Fusion Mineral Paint Tough Coat Matte Wipe-on Poly. It is great to use when you have to work indoors because there aren’t any odors and it is safe to use. I also like it because it has a matte finish. In the video below, I show you how I like to apply a top coat to a piece like this buffet.
- Once the top coat is dry, it is time to put the hardware back on and straight!
Here is the video explaining how I apply the top coat:
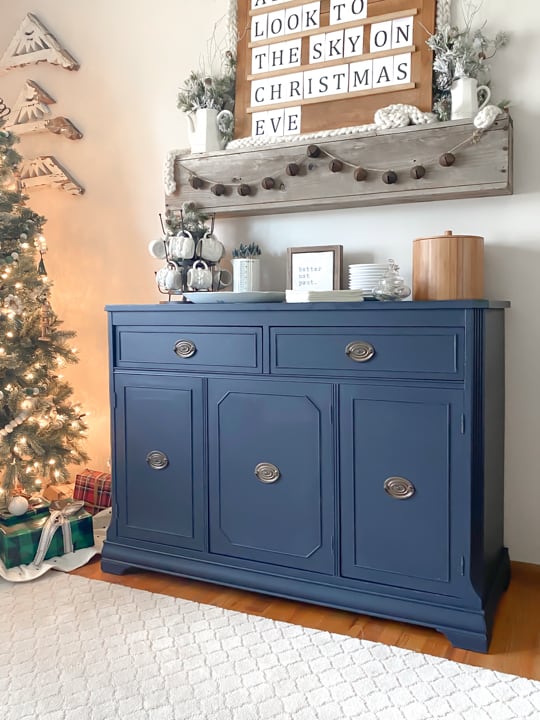
I am not someone who uses the word “obsessed” a lot, but I am obsessed with this piece now. I have never used this color before and I absolutely love it. It is beautiful. In these photos, it is photographing a lot lighter. It is a true dark navy and really brought out the richness of this buffet.
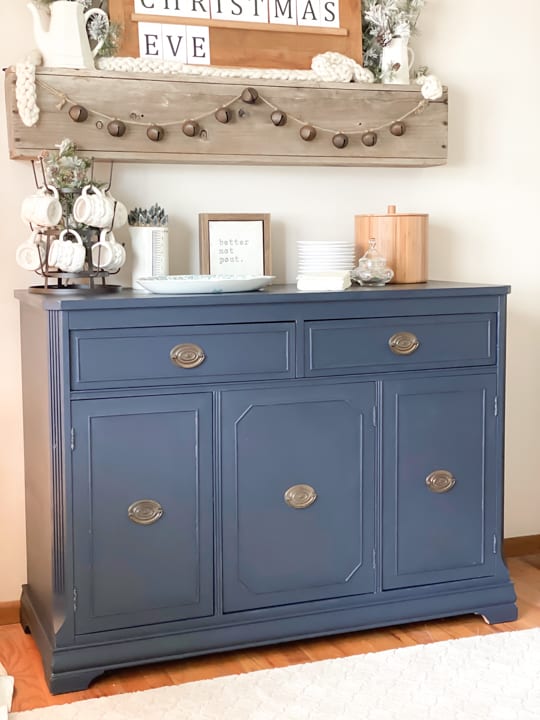
Now, this buffet commands attention.
Living in a smaller house means you have to get creative with the space you have.
In our house, buffets are used for so many things and they are the perfect surface when you entertain. You can set up an entire station on a buffet and move it into a corner in a room and be all set. Not to mention all of the storage you gain from a buffet.
It will be sad to let this one go, but I know someone is going to love it in their home.
I hope this DIY Vintage Buffet Makeover inspires you to look past the “ugly” when you see a piece and try to picture what it would look like once you get done with it.
What color would you have painted it?
PIN THIS POST!
If you liked this vintage buffet makeover, you will love these transformations:
French Provincial Dresser Makeover
Painted And Stained Dresser Makeover
Rustic Dresser Makeover Tutorial
I have 2 hutches, but would love to have a buffet instead. It probably would get used more. I need to remodel my whole kitchen.
Buffets are so versatile!
I have a Duncan Phyfe buffet in mahogany and I’m having it painted in Dixie Belle ebony with distressed edges. Can’t wait. Wish I could send pics
That would be so pretty!!!
Did you sand down the wood or fill the divots with anything first? I didn’t know if you used a special paint or thickener to hide the imperfections, I don’t see them in the makeover.
Your directions just said you cleaned it.
I am looking at doing a similar project, need all your tips. Thank you.
I didn’t sand this one. I love using BOSS so I don’t have to sand pieces. The Dixie Belle Paint covers things so well, but there are times I have to fill in gaps or divets. Let me know if you need more tips or what your piece has and you need help with! You can always email at mycreativedays@yahoo.com. Thank you!
I have this exact piece. I am going to paint it a grey green. Thanks for all of the tips!
You’re welcome!
Can I remove side cabinets to make my antique buffet smaller to fit in my Kitchen
I am not sure since I am not there.
It is Springtime in Vermont and I’m itching to try something new. I have an old hall table in need of a makeover, and your post has inspired me! The color as it appears in the photos is terrific and would be a good choice for where the table is located since navy blue would be too dark. Thank you for all the information you provided, especially in the video.
I am so glad! Thank you for coming over to give me this message! Good luck in your project!
Hi I am going to make over a built in bar. It is stained red mahogany and is shiny. Should I sand it down first before I prime it. I’m going to paint it black.
You can send photos and submit it here: https://bit.ly/3vNNXwi
I have this exact same buffet and in the same condition. Am going to paint it black. Did you just paint the front of the drawers and how did you paint the doors on the bottom. Worried about them sticking.
Yes, I just painted the front of the drawers. Just paint the doors. If you are worried about the sticking, you don’t have to paint the underside of the door on the bottom if that makes sense.