I have been on the hunt for an original vintage aluminum Christmas tree for a long time. If I want, I can pay hundreds of dollars to get one or just continue to stalk my local thrift stores, yard sales, and estate sales, knowing that some day, I will come across one at a price I am happy with. I am choosing the latter. Until then, I knew there had to be a way for me to DIY one on the cheap to display some of my vintage ornaments. And, I know I have so many vintage-loving friends here who would appreciate this project as well. So, let’s make a DIY Vintage Aluminum Christmas Tree that is an amazing dupe until we find the real thing!

What Is a Vintage Aluminum Christmas Tree?
If you’ve ever seen vintage holiday photos from the 1950s or 1960s, you’ve probably spotted a shiny, sparkly aluminum Christmas tree. These retro trees were made with metallic tinsel branches that reflected light beautifully and have become highly collectible today. Original vintage aluminum Christmas trees can be pricey. They are usually hundreds of dollars, depending on size, condition, and brand. This DIY Vintage Aluminum Christmas Tree is a great alternative until you can score the real thing.
{Affiliate links are used in this post. Click on any of the underlined links to find the products I am talking about. You can read my disclosure .}
Supplies Needed To Make A DIY Vintage Aluminum Christmas Tree
- Silver Tree
- Cutters
- Silver Bells
- Vintage Ornaments
- New Base (see *note below)
* NOTE: I am still on the hunt for the perfect base for my DIY Vintage Aluminum Christmas Tree. I want to find something ornate and metal, like an lamp base. I tried my hardest to find something before I made this post, but it didn’t happen. Rest assured, as soon as I find it, I will be removing the base the tree came with. I love changing out boring bases with unique ones. I shared some of my favorite swaps I have done over the years in my post HERE.

Easy Step-by-Step Tutorial For This DIY Vintage Aluminum Christmas Tree
- First, we spread out each level of branches on the tree so they weren’t tangled up with branches above or below their level.
- Next, we chose to alternate between each row with how much we cut. We started with the bottom row and used the cutters to cut every third branch off. Then, the next level, we cut off every other one.
- We did this same pattern all the way up the tree. You want the tree to look less full, like a real vintage aluminum tree would look.
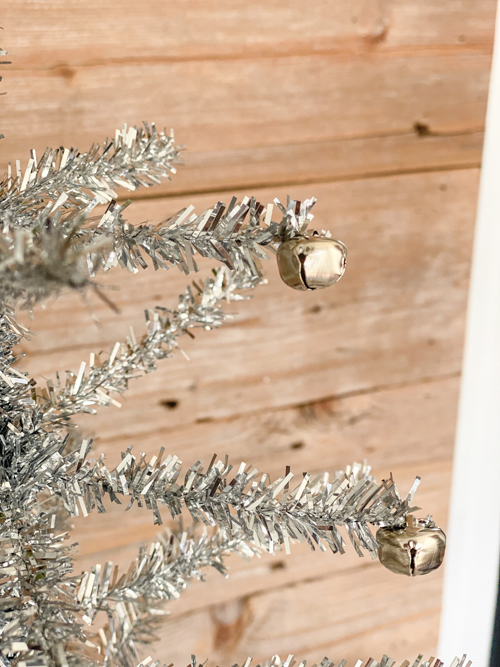
- Then, we added a silver bell to the end of each branch. We didn’t need to glue them. They fit snug at the end of the branches.
- Then, you are ready to hang your vintage ornaments!
- As I said before, I will be changing out the base of my tree once I find the perfect piece.
I love the way it turned out.


It is the perfect-sized tree for a coffee table, too.

It is so easy to make, and you don’t need a lot of tools to get the project done. Just one!

Anyone can do this.

And, for less than $20 invested, I am good with this one until the real one comes across my hunt someday.
PIN THIS POST!
If you liked this DIY Vintage Aluminum Christmas Tree, you will also love these projects:
Dollar Store Christmas Swags DIY
DIY Scandinavian Advent Calendar
DIY Velvet Christmas Ornaments
Really cute and vintage-y!
Thank you!