

If you want to know how to paint kitchen cabinets, I completely understand the hesitation. For years, I wanted to paint our kitchen cabinets, yet I feared ruining them. What if the paint chipped? What if the finish looked terrible? What if I hated the color?
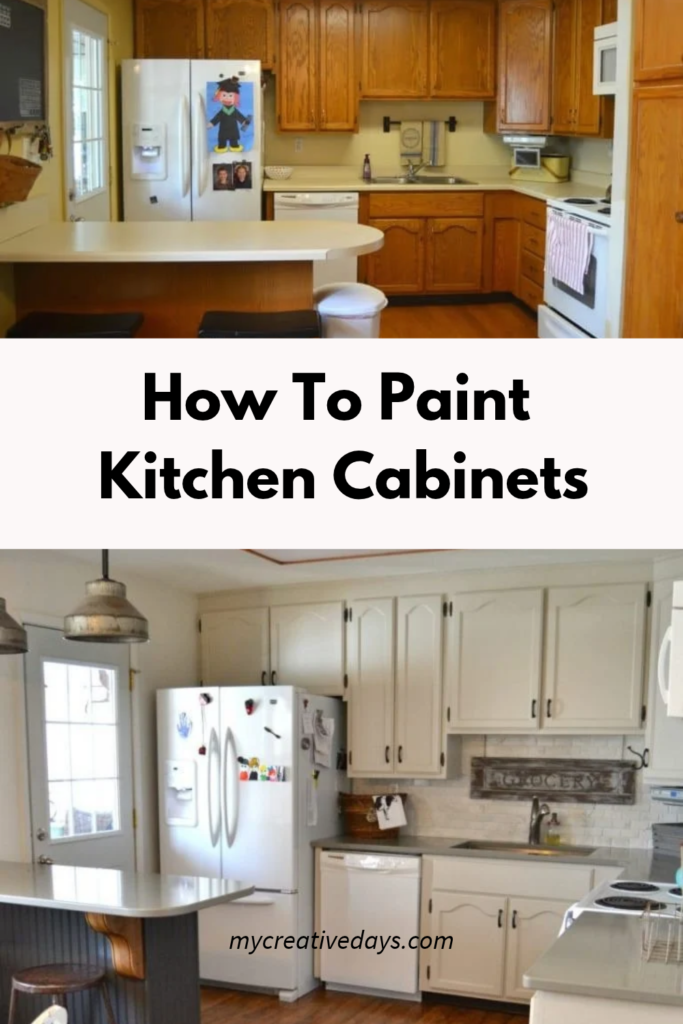
Our kitchen had orange oak cabinets, and I was ready for a change.
Eventually, we decided to go for it.
Since then, we have painted cabinets in our own home and in several of our flip houses. We have learned a lot about preparing cabinets, choosing paint, getting a smooth finish and, probably most importantly, what is worth spending your time on.
So, if you are thinking about painting your kitchen cabinets, this is what I wish I had known before we started.

Can You Paint Kitchen Cabinets?
Yes!
If your cabinets are in good condition and you like the layout of your kitchen, painting the cabinets can completely change the look of the room without replacing them.
The biggest thing to understand is that painting kitchen cabinets is more about the preparation than the actual painting.
Cleaning, preparing the surface, choosing the right products, and allowing enough drying and curing time are what make the biggest difference in how your finished cabinets look and hold up.
You don’t need to be a professional cabinet painter to do this. You just need to be willing to take your time.

Before You Paint Your Kitchen Cabinets
Before you start, take a good look at your cabinets.
Painting is a great option when:
- Your cabinets are structurally sound.
- You like the existing kitchen layout.
- The doors and drawer fronts are in good shape.
- You want to change the color without replacing the cabinets.
- You are willing to put some time into the prep work.
If your cabinets are damaged, warped or falling apart, painting may not solve the problem.
Also, consider what your cabinets are made from. Wood, laminate, and other cabinet surfaces can require different preparation and primer. Always make sure the products you choose are compatible with your cabinets.

{Affiliate links are used in this post. Click on any of the underlined links to find the products I am talking about. You can read my disclosure HERE.}
Supplies You Need to Paint Kitchen Cabinets
Your exact supplies will depend on your cabinets and the products you choose, but here is what we used and what I recommend having ready:
- Cabinet-safe cleaner/degreaser
- Clean rags or microfiber cloths
- Sander
- Vacuum
- Tack cloth or clean lint-free cloth
- Wood filler, if needed
- Painter’s tape
- Drop cloths or plastic
- Primer, if required for your paint system
- Cabinet paint
- Quality paintbrush
- Small roller and roller covers
- Paint tray
- Screwdriver or drill
- Small bags or containers for hardware
- Labels or painter’s tape for numbering doors and drawers
Having everything ready before you start will save you a lot of frustration.

Step 1: Remove the Cabinet Doors and Hardware
Remove the cabinet doors, drawer fronts, hinges, knobs and pulls.
This is also when you want to label everything.
We labeled our doors and kept the hardware organized so we knew where everything belonged when we were finished.
It might seem unnecessary when you are taking everything apart, but trust me. When you have a pile of cabinet doors that all look almost identical, you will be very happy you labeled them.
If you are changing the hardware, this is also a good time to fill any old holes that will no longer be used.

Step 2: Clean the Cabinets Really Well
This is one of the most important steps when you paint kitchen cabinets.
Kitchen cabinets collect grease, cooking residue and dirt, especially around the handles and near the stove. Even if they look clean, there can be a layer of grime that you don’t want underneath your paint.
Use a cleaner or degreaser that is appropriate for your cabinet surface and follow the product directions.
Pay extra attention to:
- Around the cabinet hardware
- Around the stove
- Cabinet door edges
- Corners
- Areas that are frequently touched
- Any visible grease or buildup
Let the cabinets dry completely before moving on.
Do not skip this step.
Paint needs a clean surface to adhere properly.
Step 3: Repair Any Damage
Now is the time to fix anything you don’t want showing through your new paint.
Fill dents, scratches, old hardware holes or other imperfections as needed.
Once the filler is dry, sand it smooth.
Remember, paint does not magically make every imperfection disappear. A fresh coat of paint can actually make some flaws more noticeable because everything is now the same color.
Step 4: Do You Have to Sand Kitchen Cabinets?
This is one of the questions I get asked the most.
Not necessarily.
There are primers and paint systems designed to adhere to certain existing finishes without traditional sanding. Whether you can skip sanding depends on your cabinet material, existing finish and the products you are using.
When we painted our kitchen cabinets the first time, we did sand them.
And there was a LOT of sawdust.
We used a rotary sander to help prepare the cabinets, and I felt like that dust was everywhere for days.
Would I automatically use a rotary sander on every kitchen cabinet today?
No.
The important thing is to properly prepare the surface for the products you are using. That may involve sanding, a bonding primer or a combination of preparation methods.
If your paint or primer manufacturer gives specific preparation instructions, follow those.
I also have a separate post about How to Paint Kitchen Cabinets Without Sanding if that is the route you are considering.

Step 5: Remove the Dust
If you sand your cabinets, make sure you remove all of that dust before painting.
Vacuum the surfaces and wipe them down thoroughly with a clean cloth appropriate for the surface.
You don’t want sanding dust trapped underneath your primer or paint.
Step 6: Prime the Cabinets
Whether you need primer depends on your cabinet material, existing finish, and the paint you are using.
Some paint systems require or recommend primer, while bonding primers can be especially helpful when you are painting a difficult surface.
Choose a primer that is compatible with both your cabinet surface and your topcoat.
Follow the manufacturer’s directions for application, drying, and recoat times.
Don’t just grab the first primer on the shelf because it says “primer” on the can.
The right product matters.

Step 7: Choose Your Cabinet Paint
One of the biggest mistakes you can make is treating kitchen cabinets like a wall.
Kitchen cabinets get touched, bumped, opened, closed and cleaned constantly.
I recommend using paint or coating specifically designed for cabinets, trim, furniture or other high-use surfaces and making sure it is compatible with your existing cabinet finish.
When we painted our kitchen cabinets, we used Sherwin-Williams primer and ProClassic paint.
I chose Agreeable Gray because I wanted to get rid of the orange oak but didn’t want bright white cabinets.
I spent a ridiculous amount of time deciding on the color.
And then, because timing works that way sometimes, we happened to start this project when Sherwin-Williams was having a sale.
I was not complaining.
Step 8: Test Your Color and Products
Before painting your entire kitchen, test the paint and your preparation process on a small area.
This gives you a chance to see:
- How the paint adheres
- How the color looks in your kitchen lighting
- How the finish looks when dry
- Whether you like the brush or roller you are using
Do not skip the color test.
The color you love on a tiny paint chip can look very different once it is covering an entire kitchen.

Step 9: Set Up a Place to Paint the Doors
This is something you should figure out before you remove all the cabinet doors.
Where are they going to go?
You need a clean, dry area where you can paint and allow the doors to dry without being disturbed.
When we painted our kitchen, we picked the most humid week possible.
Of course we did.
We ended up setting up tables in our basement toy room and using the laundry room as another area for the doors.
Which meant the laundry room was no longer really a laundry room.
For quite a while.
If you can paint in a clean, protected area with good ventilation and reasonable temperature and humidity, it will make the project much easier.

Step 10: Paint the Cabinet Doors and Drawers
Painting the doors flat is much easier than trying to paint them while they are hanging.
Use a quality brush for detailed areas and an appropriate roller for larger flat surfaces.
Apply thin, even coats rather than trying to cover everything with one thick coat.
Pay close attention to the edges and corners.
Our cabinet doors had areas where paint could easily collect, so Matt would roll the larger sections while I followed behind with a brush to work on the corners and edges.
It worked really well for us.
If you are doing the project alone, you can do the same thing. Just work in smaller sections and keep checking for drips.
Don’t Try to Get Perfect Coverage With the First Coat
Your first coat may look terrible.
Seriously.
Don’t panic.
The first coat is not supposed to look like the finished cabinets.
It is much better to apply several thin coats than one thick coat that takes forever to dry and leaves you with drips and buildup.
Let each coat dry according to the paint manufacturer’s instructions before applying the next one.

Step 11: Paint the Cabinet Boxes
Once you have the doors underway, paint the cabinet boxes.
Protect your countertops and floors before you start.
Use a brush and roller combination that works with your paint.
Be especially careful around:
- Inside corners
- Cabinet edges
- Hinges
- The underside of upper cabinets
- Areas around appliances
- Places where paint can pool
If you see a drip while the paint is still workable, smooth it out.
If you don’t notice it until the paint has dried, don’t panic.
We had drips.
I remember thinking, “Well, we ruined that.”
We didn’t.
We smoothed them out and painted again.
Paint mistakes can usually be fixed.

How Many Coats of Paint Do Kitchen Cabinets Need?
There isn’t one magic number of coats for every kitchen.
It depends on the original cabinet color, your new color, the paint you are using, the surface and whether you are using primer.
Plan on multiple thin coats rather than one thick coat.
Let each coat dry for the time recommended by the manufacturer before applying another.
And don’t judge the finished color while the paint is still wet.
It can change as it dries.

How Long Does It Take to Paint Kitchen Cabinets?
This is not a one-afternoon project.
The amount of time depends on the size of your kitchen, the number of doors and drawers, how much prep is needed and how many coats you apply.
You need time for:
- Removing everything
- Cleaning
- Repairs
- Sanding or other surface preparation
- Priming
- Painting
- Drying between coats
- Reinstalling the doors and hardware
- Curing
My biggest advice?
Give yourself more time than you think you need.
You don’t want to be standing in your kitchen at 10 p.m. trying to get “just one more coat” done because you promised yourself everything would be finished by the weekend.
Ask me how I know.

How Long Do Painted Kitchen Cabinets Need to Cure?
Dry and cured are not the same thing.
Your cabinets may feel dry before the finish has reached its full hardness.
Follow the cure-time instructions for the specific paint or coating you use.
Do not rely on a random “24 hours” recommendation you found online if your product says something different.
This is especially important because cabinet doors and drawers get a lot of use and rubbing.
Give your new finish the time it needs.

How to Avoid Brush Marks and Drips
A few things can make a big difference:
- Don’t overload your brush.
- Use thin coats.
- Use the appropriate roller for your paint.
- Don’t keep brushing an area after the paint starts to set.
- Watch corners and edges for paint buildup.
- Smooth drips as soon as you notice them.
- Keep your drying area clean and free of dust.
- Follow the manufacturer’s instructions for sanding between coats if recommended.
And one of the hardest lessons:
Sometimes you need to stop touching it.
If the paint looks a little imperfect while it is drying, leave it alone.
Going back over it again and again can make the finish worse.

Should You Paint the Inside of the Cabinets?
You can, but you don’t necessarily have to.
We focused on the parts of the cabinets that made the biggest visual difference.
Painting the interiors adds a lot more work, especially if you have a lot of shelves and awkward corners.
If you really want the entire cabinet painted, go for it. Just know that you are adding significantly more time to the project.
What About the Cabinet Hardware?
When we painted our kitchen cabinets, I wasn’t ready to buy new hardware yet.
So I cleaned up the old hardware and spray painted it black.
It was an inexpensive way to make everything look more finished while we figured out what we wanted to do long-term.
If your hardware is in good shape and you like it, you may not need to change it at all.
Sometimes changing the hardware is enough to make painted cabinets feel completely different. I did end up replacing our hardware after a couple of years.

What I Learned From Painting Kitchen Cabinets
After painting our kitchen and then doing cabinets in our flip houses, these are the things I would want you to know before starting:
Prep is worth the time. Don’t rush the cleaning and surface preparation because you are excited to start painting.
Label everything. You will thank yourself when it is time to put the kitchen back together.
Have a plan for the doors. They take up a surprising amount of space.
Don’t panic over a bad first coat. It is just the first coat.
Don’t rush drying or curing. Getting your kitchen back together faster is not worth messing up the finish.
Test your products. Especially if you are painting a surface you have never painted before.
And finally…
You can change your kitchen without replacing your kitchen.
That was the biggest thing we learned.
Frequently Asked Questions About Painting Kitchen Cabinets
What is the best paint for kitchen cabinets?
Look for a paint or coating specifically recommended for cabinets, furniture, trim, or other high-use surfaces. The right product depends on your cabinet material and existing finish.
Do you have to sand kitchen cabinets before painting?
Not always. Some products are designed to adhere to existing finishes with minimal or no traditional sanding. However, proper cleaning and surface preparation are still important. Always follow the preparation instructions for the products you use.
Can you paint kitchen cabinets without primer?
Sometimes, depending on the surface and paint system. Some products are designed as self-priming or have different preparation requirements. Check the manufacturer’s instructions rather than assuming primer is unnecessary.
Can you paint oak kitchen cabinets?
Yes. Oak cabinets can be painted, but the grain can remain visible depending on how you prepare and fill the surface. If you want a very smooth finish, additional preparation may be necessary.
Can you paint laminate kitchen cabinets?
Some laminate cabinets can be painted, but adhesion and preparation are especially important. Use products that are specifically compatible with your surface.
Can you paint kitchen cabinets with a brush?
Yes. You can paint cabinets with a brush, although many people use a combination of a brush and roller to get a smoother finish on larger flat areas.
How long do painted kitchen cabinets last?
The longevity of painted cabinets depends on preparation, the products used, application, and everyday use. Proper preparation and allowing the finish to fully cure are important for durability.
If you have been searching for how to paint kitchen cabinets because you are standing in your kitchen wondering whether you should actually do this, I hope this helps.
I was nervous the first time we painted ours.
I was convinced we might ruin them.
We didn’t.
And after painting cabinets in our own home and in our flip houses, I am much more comfortable taking on this project.
It isn’t a quick project.
It isn’t completely mess-free.
And there will probably be a moment when you wonder why you started.
But if your cabinets are in good shape and you like your kitchen layout, painting them can make a huge difference.
Take your time with the prep, don’t rush the drying and curing, and remember that a mistake doesn’t automatically mean you’ve ruined the whole project.
You can fix a lot of things with a little more sanding and another coat of paint.
And maybe do your laundry first.
Because if your laundry room becomes a cabinet-door drying room, you might not be doing laundry for a while. 😉
PIN THIS POST!
If you liked this post, you will also enjoy these projects for your home:
How To Brighten Up Your Space Without Paint
Oh my goodness! I LOVE your painted cabinets. This totally makes me want to start cleaning cabinet doors right now and start painting my own orangey oak kitchen!
Thank you so much Ashley. It is a big job. I am finally happy we have a small kitchen. Less cabinets to paint. 😉
Hello nice job did you use a Polycrylic after you finished?
No Terri. The staff at Sherwin Williams didn’t say I had to. The paint we chose from them was good enough. It has been easy to wipe and clean too.
Thanks!! I’ve been scared to try painting. And I would like to paint the top cabinets a lighter color and the bottom a darker color.
You are in the same boat I was in. I was SCARED TO DEATH! If you get the right paint and have someone help you, it really wasn’t that bad. I also thought about darker on bottom and lighter on top and decided to paint our bar/island a charcoal gray instead. I will be sharing more of that when we get more done. If you have any questions, please don’t hesitate to ask. I was so scared that it took me two years to finally do it. I am happy I did. Once we get it all done, I know it is going to be worth it!
love the finished project, I’m into this older kitchen now 2 years as well. I WANT A CHANGE…..thank’s for all the information and I’ll try now to work up my nerve.
Awesome job and it looks fantastic! Makes the room so much brighter and it looks bigger! What a team!
Thank you Kim! Now on to the next projects in the kitchen……..
Wow what a difference! I love the color too! I painted the cabinets at the farm and they went from ugly to pretty just like that. They aren’t extremely nice cabinets – sturdy but plain. It’s amazing what a coat of paint did for them. I love them still after three years. I wish I would have used a roller but I brushed.every.single.one. Yikes!
Wow! Brush only. Nice job. The people at Sherwin Williams told us which supplies to use so we went with their suggestions.
Did you paint the inside of the cabinets too, or just the outside?
Just the outside.
What is the name of the island color (blue) in this post?
It is a charcoal gray color. It is called Monument from Dutch Boy. I got it at Menards. Thanks!
My Kitchen takes a beating! How are yours holding up? They look amazing and I’m tired of procrastinating!
They are holding up well. There are a few spots in the high traffic areas that I am going to touch up (when I get around to it). 😉
I love the painted cabinets and wish I had gone with paint when renovated. It always says PIN this to save, but I don’t see anyway to pin it. Am I missing something?
If you hover over any picture, a pin button should come up so you can pin it.
Thanks for share………..